Creating Translation Lists
Project Translation Overview
Project translation is also known as Client localization. This is how the user can choose their language-of-choice for the project they are working with. When the user selects a language, the Client will change its text in accordance with the project's translation settings. Translations work with all components (i.e., Labels, Charts, Multi-State Buttons, etc.,).
Translation Notes
-
It's important to note that there is no translation for text within Table components.
-
For Text elements that have bindings, the translation occurs after the binding is evaluated.
The Translation Manager allows you to view all the terms from all your projects in the global translation database. You can add, edit, and remove terms, and provide translations, as well as allow users to easily import and export translatable components. The translation database shares terms across all projects and with other users.
Setting up New Languages, Terms, and Translations
Setting up new languages and adding terms for translation is pretty easy. For every element of text on the screen, you can provide a translation in the desired language. When a user logs into a project, they can choose their preferred language, and all the text will be displayed in their preferred language. They can also have their preferred language defined in user settings so when a user logs into the Client, their preferred language is automatically enabled.
Component vs Global Terms
There are two types of terms used in the translation system: Component and Global. Both behave a little differently, and it's important to know the difference.
-
Component Terms - Component level terms are specific to that one component, and translations are added to the translation system using the Translatable Terms Panel. Any component level translation will automatically take precedence in the event there is a matching global term.
-
Global Terms - Global terms and translations are available in both the Translatable Terms Panel and in the Translation Manager's global database. The global translation database provides language translations on all components, in all windows, and on all projects. You can setup global translations so that anywhere a term is used within your project, it will get replaced with that global translation. Although, there are times, when a component might have a different context than the global translation. For this reason, you may want to create a component level translation to take precedence over the global translation. For example, some users may work in a specific window of a project, and what is typically called a 'Tank,' this group of users refer to it as a 'Barrel.' You can create a component level translation for 'Barrel' to take precedence on the root container of a window. This way the users see the term in the context that is familiar to them.
To Add a New Language
-
In Designer, right click in your workspace and select Translations from the dropdown. The Translatable Terms window will open.
-
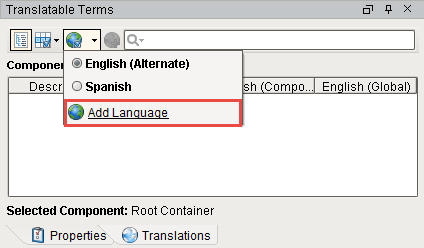
Select the Earth icon, and click Add Language. By default, the English language is defined.
-
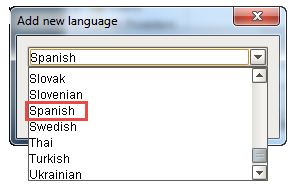
Select a new language from the dropdown. That's all there is to it! You can create as many languages as you need for your project.
To Add Global Translation Terms
Creating global translations is always a good first choice over the component level translation because most of your translated terms will be used across all projects unless you want one particular term to be different from the global translated term.
There are a couple of ways to add terms to the Translation Manager. You can add new terms directly to the Translation Manager or by selecting terms from the Translation Terms Panel.
Let's add some terms directly to the Translation Manager.
-
From the menu bar at the top, go to Tools > Translation Manager.
-
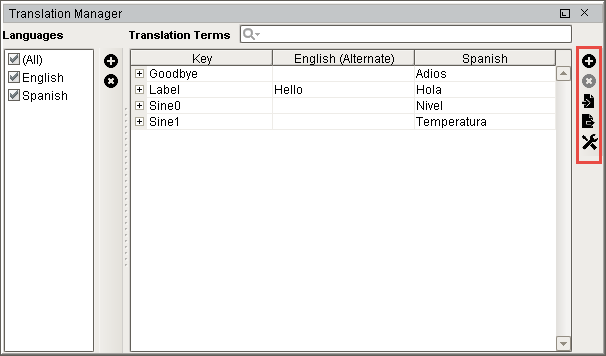
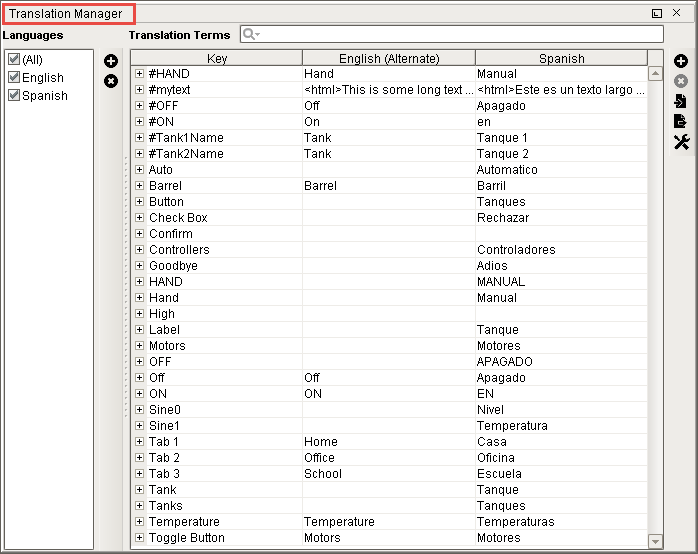
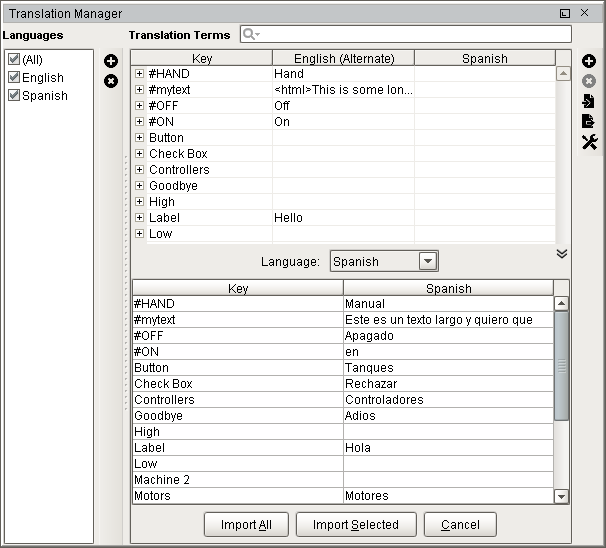
The Translation Manager window will open, and you can view all the terms that were added. This example has terms that were already added and translated.
-
On the right side of the window, there is a list of icons where you can add, delete, import, export, and edit the Translation settings.
-
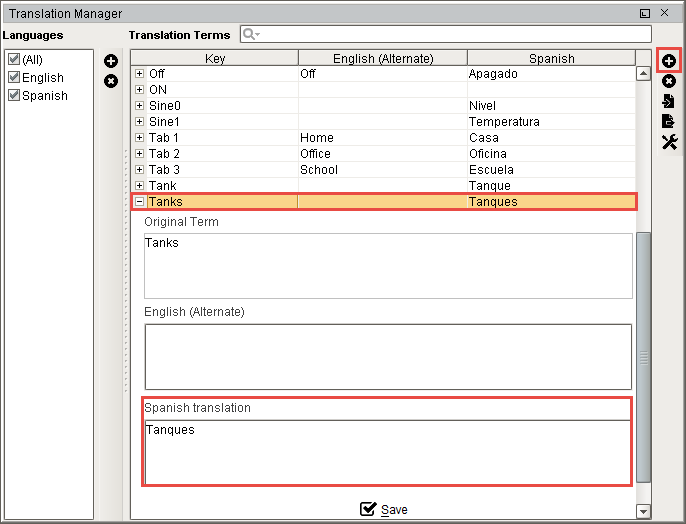
To add a new global term, click on the plus icon. Enter the term (Tanks), and press OK.
-
Double click on the row of the new term, and under Spanish translation, enter the word 'Tanques.' Click Save.
-
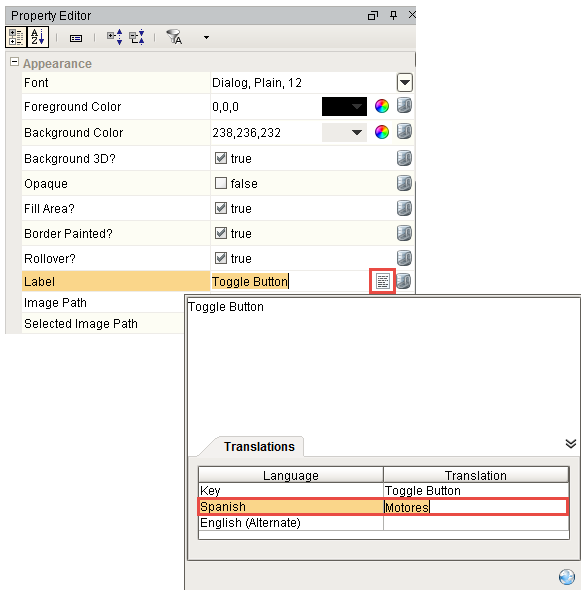
For Text components on a screen (i.e., Label, Button, Toggle Button, etc.,), you can add translations in the Property Editor. Under Appearance, click on the text box next to the name of the text component. Click the Translation Button at the bottom of the text window. Click the green plus icon to add a translation. After you enter the translation, hit enter. The term will be added to the global translation database.
-
To view all the global terms added to a project, go to Tools > Translation Manager. If you want to provide a translation to a term that has not been translated, double click on the row of the term, enter the translation, and click Save.
-
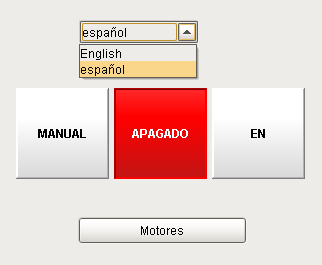
Now, let's test it out! Drag a Language Selector component to your window. Go into Preview Mode, and toggle the languages. You will see the languages for the text switch between English and Spanish for these two components.
To Add Component Level Translation Terms
What's nice about adding component translation terms is that the Translatable Terms panel provides all the terms for that component on the window. All you have to do is add the translations. The Translatable Terms Panel is a central place to manage all the translations associated with a specific component. One important reason to use a component level term is if it is going to be different from the global term. Just remember, that because a term is translated at the component level doesn't mean that other components get to use it. Typically, it is used for that component only.
Let's get started!
-
In Designer, drag a Multi-State Button from the Component Palette in to your workspace.
-
Right click on the component and scroll down to Translations. The Translatable Terms panel will open and display all the terms for the specific component. Alternatively, you can right-click on the Root Container of a window and select Translations. The Translatable Terms Panel will display all the terms for all the components on the window.
Translatable Term Options
In the Translatable Terms Panel, you have the option of adding your translation to the Component, Translation Manager global database, or marking it for translation at a later time. You'll notice under the Component Terms section of the Translatable Terms window that there are four columns; Component Description, Key, Component translation, and Global translation.
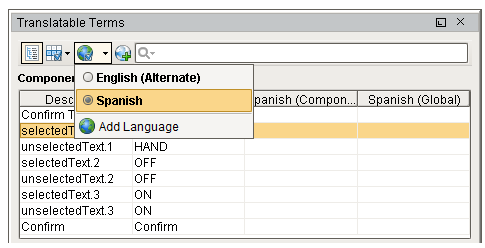
You'll see below, all the terms for the Multi-State Button, and none of the terms have translations added. If you don't see the language you want your terms translated to, click the Earth icon
 , and select the language (i.e., Spanish). You will then see a column for your component translation and global translation.
-
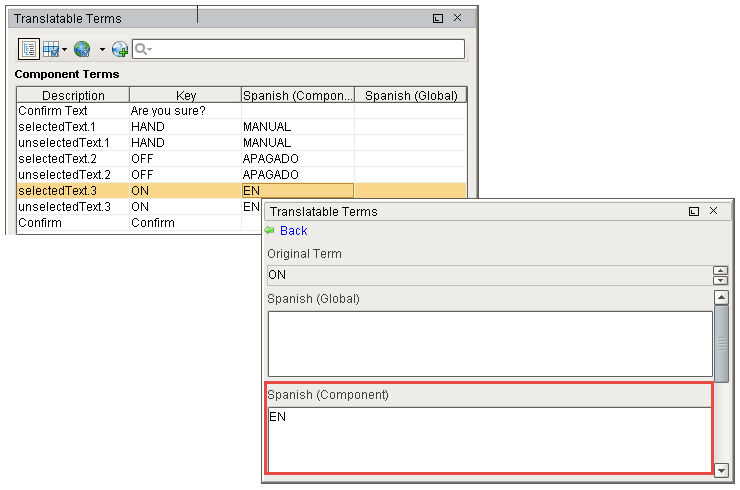
To add translations for your component terms, double click the row of your term (i.e. ON). In the Spanish Component box, enter the translation (i.e, EN). You also have the option of creating a global translation on the Translatable Terms Panel as well. Then, click the Back link, and repeat this step for all your terms.
-
Once you entered the translations for all your terms, you will see them on the Translatable Terms Panel in the Spanish (Component) column. If a term doesn't have a translation, you can select the term and mark it for translation by clicking the Earth with a green plus icon. This adds the term(s) to the translation database for someone else to add the translation.
In this example, you'll notice several things about each of the terms so look closely at them. You'll find examples of both component and global level terms, a component level term, a global term, a component term that overrides a global term, and terms marked for translation.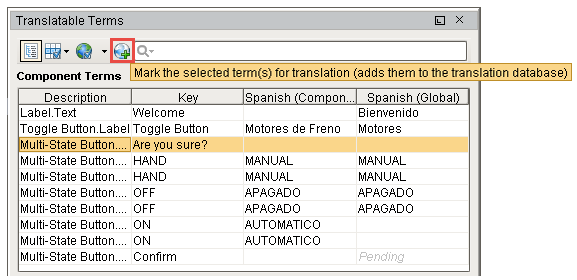
-
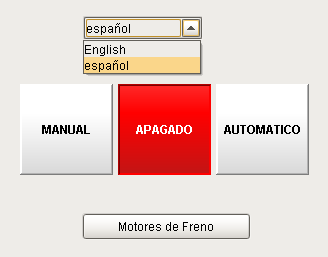
Let's test it out! Drag a Language Selector component from the Component Palette to your workspace. Go to Preview Mode, select Spanish from the dropdown to see the text change from English to Spanish for these two components.
Translation List Import and Export
The ability to import and export terms and translations can be extremely important particularly to a large project. It allows you disseminate terms and translations rapidly, send them to a third party for translation, and keeps all related projects up-to-date.
To Export Terms from a Window
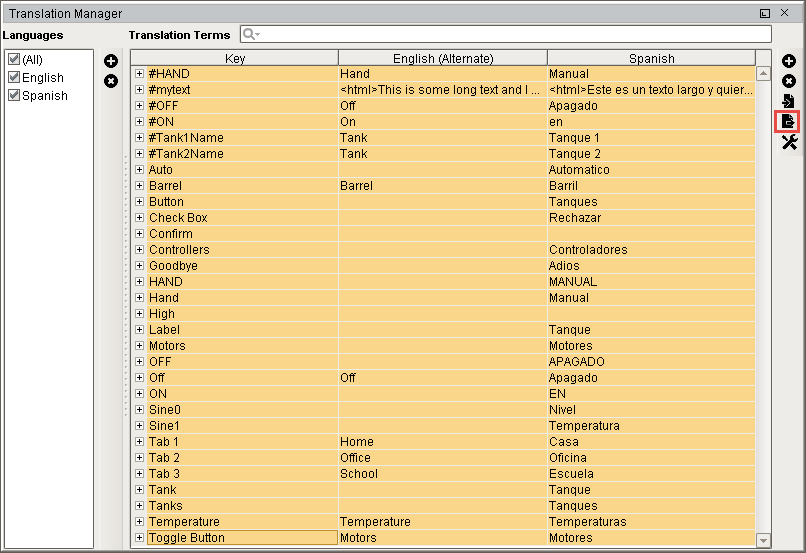
Let's export some terms from the Translation Manager. In this example, you can see all the terms that were added to the Translation Manager. You can export selected terms, or all terms from the Translation Manager.
-
Go to Tools > Translation Manager. Select all terms or only specific terms to export. Click on the Export Terms icon on the right side of the Translation Manager window.
-
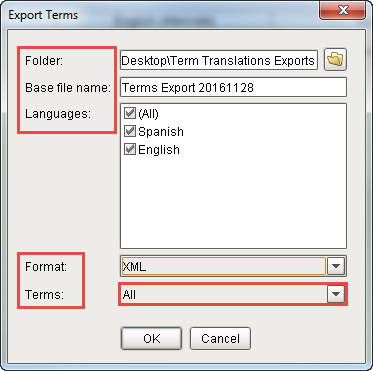
The Exported Terms window will open. Enter the following information:
-
Select the Folder location where you want to put your exported terms.
-
Enter the Base file name. (File name of your exported terms).
-
Select the appropriate Languages. You can have multiple languages selected depending on the number of language translations you are using (i.e., English, Spanish, and French). This example exports two files: one for the English translation, and one for the Spanish translation.
-
From the Format dropdown list, select either PROPERTIES or XML. Both formats behave the same, the only difference is that the XML format supports UTF-8 encoding directly. A person can now translate the XML file directly and import it back into Ignition's Translation Manager.
-
From the Terms dropdown list, choose either Selected or All.
For Specific Terms
If you want to select specific terms to export, choose 'Selected,' otherwise, 'All' terms will be exported from the dropdown list at the bottom of the window.
-
Press OK.
-
-
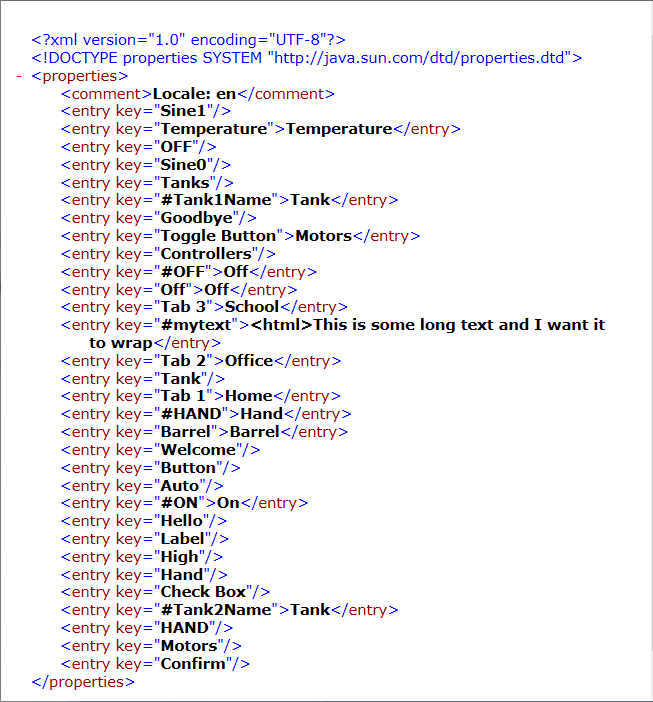
Go to the folder location and check to see if your exported files are there. You will see one file exported file for each language. Open the English exported file and verify that all the terms you intended to export are there.
To Import Terms into Ignition's Translation Manager
-
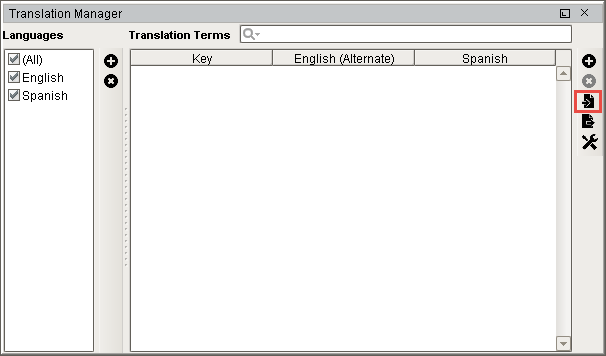
Go to Tools > Translation Manager, and select the Import Terms icon from the right side of the Translation Manager window.
-
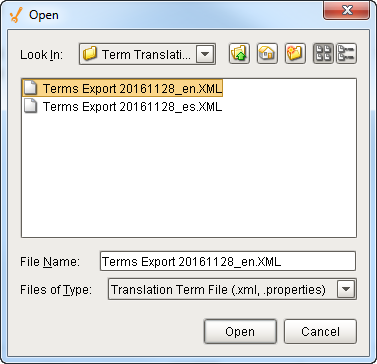
Navigate to the folder where your exported files reside, and choose the English file from the Open window, and click Open.
-
You have the option of importing selected terms or all terms. Click either Import All or Import Selected depending on what terms you want to import.
Repeat this step to import each translation file. This example imports the Spanish translation file.Imported Terms Overwrite Existing Terms
Be aware that existing terms will be overwritten by the imported term.
-
Check to see that all your terms were imported into the Translation Manager by going to Tools > Translation Manager.
Similar Topics ...
-
Switching the Current Language